Resources --- May 2005 ---
An alcohol stove is a great way to cook during three season ultralight trips. It is very quick to setup and cool down, it cooks quite well, and it is featherweight. The drawback is that alcohol doesn't produce as much heat as an equivalent volume of white gas, so for long trips or winter trips you might need a more substantial stove. Also, this stove doesn't simmer, though other alcohol stoves do.
My stove is based on Scott Henderson's Pepsi-G stove (check my bookmarks for a link). The pot stand is my own invention, though I'm sure someone has done it before.
The stove itself weighs 1/3oz. With stove stand, lighter and windscreen it is under 2oz. The stove runs on denatured alcohol (look in the paint section of any hardware store). It should also run on 90% or 100% isopropyl alcohol, though the stuff in the stores is usually 50% or 70%. I carry my alcohol in a 16oz hydrogen peroxide bottle (emptied and washed) which is quite light and rugged.
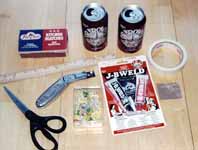
These instructions are somewhat abbreviated. Scott's are more complete. Don't worry if you make a mistake, just build another stove. They are cheap and quick to build (once you get the hang of it). Get some cans with no dents, assemble the rest of the supplies (figure 1) and get started.
To build the stove:
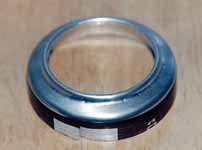
1) With a sewing needle held in a C-clamp, make about 20 holes around the bottom of a soda can (figure 2). Careful, needles tend to break. Wear eye protection. You can also use a thumbtack and small hammer, but the holes will be bigger which seems to make for a slightly less effective stove.
2) Cut out the bowl in the bottom of the can just inside the highest point on the ridge (figure 2). Use a sharp utility knife. Go around and around the same circle applying gentle pressure on the knife. Smooth the rough edges with sandpaper. Save the bowl you cut out -- it is good for mixing JB Weld.
3) Put a utility knife blade in the pages of a book so that the blade is 20mm above the table. Cut around the side of the can at this height. Do this by keeping the can flat on the table and rotating it against the knife blade while applying gentle pressure.
4) Use scissors to cut three slits up the side of the can (figure 2). These slits should stay on the flat sides and not extend into the curved base of the can.
5) Place the utility blade in the book at a height of 25mm. Cut the bottom off a second can at this height. This will be the bottom of the stove.
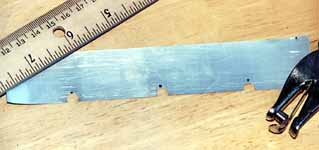
6) Cut the sides of one of the cans so you have a 30mm x 180mm rectangle. To do this, use scissors to cut a larger piece of aluminum from the side of a can (essentially, get the whole thing). Then measure the rectangle carefully. Finally, score the rectangle with the utility knife and a straight edge. Just one score will cut the aluminum enough that it can be flexed a bit and it will separate along the score line.
Use a hole punch to make 3 semicircular holes along the bottom edge. Place one hole in the center (90mm) and the other two holes 50mm offset from the center (40mm and 130mm). The result should look like figure 3.
7) Form the inner wall into a cylinder which fits precisely around the inner ring of the top section of the stove. Secure the cylinder with masking tape. Check it again to make sure it fits in the top section of the stove. Now prepare a small amount of JB Weld and use it to bond the cylinder (I use wooden kitchen matches to mix and apply the JB Weld). Add more masking tape to hold the cylinder in place. Allow to dry overnight.
8) Remove the masking tape from the inner wall cylinder. Check again that it fits in the top section of the stove. Prepare a small amount of JB Weld. Apply JB Weld to the top of the inner wall cylinder (the top is the part that does NOT have the semicircular holes punched). Place the cylinder in the top section of the stove. Be careful not to get JB Weld in the burner holes. Press and rotate the cylinder to assure a tight fit. You may wish to let this dry overnight, but it is possible to complete the stove at this point without waiting for it to dry.
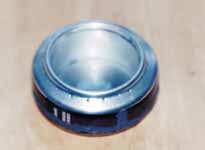
9) Assemble the bottom of the stove to the top of the stove so that the walls of the top are outside the walls of the bottom. The three slits should make this easier. You may want to cut a small shim out of leftover can wall and use the shim to help assemble the two pieces. Press the pieces together so that the inner wall cylinder is flush against the bottom of the stove. Now use JB Weld to seal the three slits and the joint between the top and bottom of the stove. Once it dries overnight, it should look like figure 4.
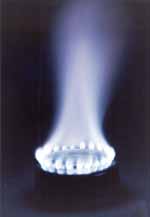
That's it. To use the stove, pour some denatured alcohol into the center of the stove. It should get sucked up a bit between the inner wall and outer wall. Hold a flame over the center of the stove to light it. Be careful! Alcohol flames are nearly invisible! After about 60 seconds, the alcohol in the stove will vaporize and start to come out the burner holes. Experiment with the amount of alcohol necessary to boil different amounts of water. Note that it is difficult to extinguish the stove. Best to just add the amount of alcohol you need, then let the stove burn itself out.
I find that adding alcohol to just over the center hump is enough to boil one cup of water. This takes about 230 seconds with the windscreen and pot top in place.
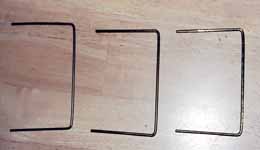
I made a pot stand out of wire coat hangers. The pot stand is designed to fit inside my pot. Multiply the diameter of your pot by 0.866 (that is cos(30) -- simple geometry or trigonometry will show why that produces the correct answer) to get the dimensions of an equilateral triangle (pot stand) which will fit inside the pot. Measure the height of the pot to determine how tall to make the stand (if you want the stand to fit entirely in the pot). Now cut and bend three sections of coat hanger to these dimensions (figure 5).
Use masking tape to hold the three sections together. Then join them at the bottom with some JB Weld. The pot stand will work in either orientation (triangle on the ground, or triangle supporting the pot) but JB Weld can't handle the heat of the stove flame. So put the JB Weld on the portion of the pot stand you expect to rest on the ground (figure 6).
After the JB Weld dried overnight, I painted the pot stand with two coats of black stove paint. This helps keep the wire coat hangers from rusting.
For a windscreen, I use heavy foil with a few holes punched in the bottom for air flow. The foil should come high up the sides of the pot and leave a 5mm to 10mm gap for exhaust gasses to escape. Cut a notch in the windscreen if necessary for the pot handles.
Enjoy your ultralight stove!
|
Fig. 1: Assemble the supplies necessary to construct the stove. Ithaca, NY -- May 2005 |
|
Fig. 2: The top part of the stove. Burner holes punched around the outside of the can ridge. Bowl cut out from the inside of the can ridge. Can cut to 20mm tall. Slits cut up the sides (one slit visible in the picture). Ithaca, NY -- May 2005 |
|
Fig. 3: Inner wall of the stove with holes punched along the bottom. Ithaca, NY -- May 2005 |
|
Fig. 4: The assembled stove. Ithaca, NY -- May 2005 |
|
Fig. 5: Three segments of wire hanger which will be assembled to make a pot stand. Ithaca, NY -- May 2005 |

|
Fig. 6: The assembled pot stand. Note that the legs must be down when in use or the JB Weld will burn. Ithaca, NY -- May 2005 |
|
The stove at full burn! Ithaca, NY -- May 2005 |